1
|
|
Summary
Braden Scale
Balance
Endurance
ADLs
Documentation
Parameters
Summary of Standardized Tests
**Completed tests and measures will be shown in the table below with pertinent goals
| Functional Test | Suggested Goal | |
| Tinetti Assessment |

|
|
| Berg Balance Scale |
|
|
| Timed Up & Go |
|
|
| Functional Reach |
|
|
| Lower Extremity Functional Scale |
|
|
| Borg Scale |
|
|
| 2-Minute Walk test |
|
|
| 5-Times Sit-to-Stand |
|
|
| Oxygen Cost Diagram |
|
|
| Barthel Index |
|
|
| QuickDASH |
|
|
Select a test here or by the tabs above
Braden Scale
Directions: For each row, select the most appropriate response.
|
Sensory Perception
Ability to respond meaningfully to pressure-related discomfort |
Completely Limited
Unresponsive (does not moan, flinch, or grasp) to painful stimuli, due to diminished level of consciousness or sedation OR limited ability to feel pain over most of body. |
Very Limited
Responds only to painful stimuli. Cannot communicate discomfort except by moaning or restlessness OR has a sensory impairment which limits the ability to feel pain or discomfort over 1/2 of body. |
Slightly Limited
Responds to verbal commands, but cannot always communicate discomfort or the need to be turned OR has some sensory impairment which limits ability to feel pain or discomfort in 1 or 2 extremities. |
No Impairment
Responds to verbal commands. Has no sensory deficit which would limit ability to feel or voice pain or discomfort. |
|
Moisture
Degree to which skin is exposed to moisture |
Constantly Moist
Skin is kept moist almost constantly by perspiration, urine, etc. Dampness is detected every time patient is moved or turned. |
Often Moist
Skin is often, but not always moist. Linen must be changed as often as 3 times in 24 hours. |
Occasionally Moist
Skin is occasionally moist, requiring an extra linen change approximately once a day. |
Rarely Moist
Skin is usually dry; Linen only requires changing at routine intervals. |
|
Activity
Degree of physical activity |
Bedfast
Confined to bed. |
Chairfast
Ability to walk severely limited or non-existent. Cannot bear own weight and/or must be assisted into chair or wheelchair. |
Walks Occasionally
Walks occasionally during day, but for very short distances, with or without assistance. Spends majority of day in bed or chair. |
Walks Frequently
Walks outside bedroom twice a day and inside room at least once every two hours during waking hours. |
|
Mobility
Ability to change and control body position |
Completely Immobile
Does not make even slight changes in body or extremity position without assistance. |
Very Limited
Makes occasional, slight changes in body or extremity position but unable to make frequent or significant changes independently. |
Slightly Limited
Makes frequent though slight changes in body or extremity position independently. |
No Limitation
Makes major and frequent changes in position without assistance. |
|
Nutrition
Usual food intake pattern |
Very Poor
Never eats a complete meal. Rarely eats more than 1/3 of any food offered. Eats 2 servings or less of protein (meat or dairy products) per day. Takes fluids poorly. Does not take a liquid dietary supplement OR is NPO and/or maintained on clear liquids or IVs for more than 5 days. |
Probably Inadequate
Rarely eats a complete meal and generally eats only about 1/2 of any food offered. Protein intake includes only 3 servings of meat or dairy products per day. Occasionally will take a dietary supplement OR receives less than optimum amount of liquid diet or tube feeding. |
Adequate
Eats over half of most meals. Eats a total of 4 servings of protein (meat, dairy products) per day. Occasionally will refuse a meal, but will usually take a supplement when offered OR is on a tube feeding or TPN regimen which probably meets most of nutritional needs. |
Excellent
Eats most of every meal. Never refuses a meal. Usually eats a total of 4 or more servings of meat and dairy products. Occasionally eats between meals. Does not require supplementation. |
| Friction & Shear |
Problem
Requires moderate to maximum assistance in moving. Complete lifting without sliding against sheets is impossible. Frequently slides down in bed or chair, requiring frequent repositioning with maximum assistances. Spasticity, contractures or agitation leads to almost constant friction. |
Potential Problem
Moves feebly or requires minimum assistances. During a move, skin probably slides to some extent against sheets, chair, restraints or other devices. Maintains relatively good position in chair or bed most of the time but occasionally slides down. |
No Apparent Problem
Moves in bed and in chair independently and has sufficient muscle strength to lift up completely during move. Maintains good position in bed or chair. |
|
|
Score: 0; Risk for developing pressure ulcers:
|
||||
Tinetti Assessment
| Task | Descriptors | ||
|---|---|---|---|
| Sitting Balance | |||
| Rises from Chair | |||
| Attempts to Rise from Chair | |||
| Immediate Standing Balance (first 5 seconds) | |||
| Standing Balance | |||
| Nudged | |||
| Eyes Closed | |||
| Turning 360 Degrees Stepping | |||
| Turning 360 Degrees Steadiness | |||
| Sitting Down | |||
| Initiation of Gait | |||
| Step Length | |||
| Step Height | |||
| Step Symmetry | |||
| Step Continuity | |||
| Path | |||
| Trunk | |||
| Walking Stance | |||
| TOTAL: | Goal: Time Frame: Week(s) | ||
Berg Balance Scale
|
Sitting to Standing: Have patient stand, trying not to use hands for support
|
Standing Unsupported: Have patient stand for two minutes without holding on
|
|
Sitting (Back Unsupported, Feet Supported): Have patient sit with arms folded for 2 minutes
|
Standing to Sitting: Have patient sit down
|
|
Transfers: Arrange chair(s) for pivot transfer. Ask patient to transfer from a seat with armrests toward one without and back again.
|
Standing Unsupported, Eyes Closed: Have patient stand with eyes closed for 10 seconds
|
|
Standing Unsupported, Feet Together: Have patient stand with feet together, unsupported
|
Functional Reach: Have patient lift arm to 90º, fingers outstretched and reach forward measuring distance from fingertips at start and finish
|
|
Pick Up Objects from Standing: Have patient pick up object placed by feet
|
Looking Over Both Shoulders While Standing: Have patient turn to look over left shoulder and repeat for the right
|
|
Turning 360º: Have patient turn completely in a full circle and repeat opposite direction
|
Alternate Step Tapping: Have patient place each foot onto step, alternating so each side has completed 4 steps
|
|
Tandem Stance: Have patient stand with feet directly in front of one another
|
Single Leg Stance: Have patient stand onto one leg without holding on
|
| TOTAL: | |
| Goal: | Time Frame: week(s) |
Timed Up & Go
| Clinician Instructions: Patients wear their regular footwear and can use a walking aid, if needed. Begin by having the patient sit back in a standard arm chair and identify a line 3 meters, or 10 feet away, on the floor. Timing begins once clinician instructs patient, "Go." | |
| Patient Instructions: Patient will stand up from seated position, ensuring back is against the seat. Patient will walk to the indicated line, turn around and return to the chair. Once sitting down, timer is stopped. | |
|
Timer |
Time Frame (for goal completion): week(s) |
Functional Reach
Setup: A yard stick is attached to a wall at about shoulder height. Measurement will be in inches to the tenth place (e.g. 12in, 8/16 of an inch would be 12.5 inches). The patient is positioned in front of this so that upon flexing the shoulder to 90 degrees, an initial reading on the yard stick can be taken. The practitioner takes a position 5-10 feet away from the patient, viewing the patient from the side.
Instructions: Position the patient close to the wall so that he or she may reach forward along the length of the yardstick. The patient is instructed to stand with feet shoulder distance apart then make a fist and raise the arm up so that it's parallel to the floor. At this time, the practitioner takes an initial reading on the yard stick, usually spotting the knuckle of the third metacarpal. The patient is instructed to reach forward along the yardstick without moving the feet. Any reaching strategy is allowed, but the hand should remain in a fist. The practitioner takes a reading on the yardstick of the farthest reach attained by the patient without taking a step. The initial reading is subtracted from the final to obtain the functional reach score.
Instructions: Position the patient close to the wall so that he or she may reach forward along the length of the yardstick. The patient is instructed to stand with feet shoulder distance apart then make a fist and raise the arm up so that it's parallel to the floor. At this time, the practitioner takes an initial reading on the yard stick, usually spotting the knuckle of the third metacarpal. The patient is instructed to reach forward along the yardstick without moving the feet. Any reaching strategy is allowed, but the hand should remain in a fist. The practitioner takes a reading on the yardstick of the farthest reach attained by the patient without taking a step. The initial reading is subtracted from the final to obtain the functional reach score.
Age:
Gender:
Distance: inches
Time Frame (for goal completion):
Normative Value (based on age, gender):
Lower Extremity Functional Scale
Instructions: This is a self-assessment for the patient to complete. If the patient is unable to use the device, the clinician may ask the questions aloud.
| Activities |
Unable / Extreme Difficulty |
Quite a Bit of Difficulty |
Moderate Difficulty |
A Little Bit of Difficulty |
Completed Without Difficulty |
||
|---|---|---|---|---|---|---|---|
| Any of your usual work, housework, or school activities. | |||||||
| Your usual hobbies, recreational or sporting activities. | |||||||
| Getting into or out of the bath. | |||||||
| Walking between rooms. | |||||||
| Putting on your shoes or socks. | |||||||
| Squatting. | |||||||
| Lifting an object, like a bag of groceries from the floor. | |||||||
| Performing light activities around your home. | |||||||
| Performing heavy activities around your home. | |||||||
| Getting into or out of a car. | |||||||
| Walking 2 blocks. | |||||||
| Walking a mile. | |||||||
| Going up or down 10 stairs (about 1 flight of stairs). | |||||||
| Standing for 1 hour. | |||||||
| Sitting for 1 hour. | |||||||
| Running on even ground. | |||||||
| Running on uneven ground. | |||||||
| Making sharp turns while running fast. | |||||||
| Hopping. | |||||||
| Rolling over in bed. | |||||||
|
TOTAL: | ||||||
Borg Scale (Ratings of Perceived Exertion)
Directions: Have patient complete each activity and directly after rate themselves on the scale below, with the descriptors indicating severity of shortness of breath. Alternatively, heart rate can be used to complete the assessment. If unable to complete, select the appropriate response.
| Use Pulse | Sit Still | Sit to Stand | Walk 10 Feet | Walk 50 Feet | Climb 3 Steps | Climb 12 Steps | |||
|---|---|---|---|---|---|---|---|---|---|
| 6 60 BPM | |||||||||
| 7 - Very, very light 70 BPM | |||||||||
| 8 80 BPM | |||||||||
| 9 - Very light 90 BPM | |||||||||
| 10 100 BPM | |||||||||
| 11 - Fairly light 110 BPM | |||||||||
| 12 120 BPM | |||||||||
| 13 - Somewhat hard 130 BPM | |||||||||
| 14 140 BPM | |||||||||
| 15 - Hard 150 BPM | |||||||||
| 16 160 BPM | |||||||||
| 17 - Very hard 170 BPM | |||||||||
| 18 180 BPM | |||||||||
| 19 - Very, very hard 190 BPM | |||||||||
| 20 200 BPM | |||||||||
| Unable to Complete | |||||||||
|
|||||||||
2-Minute Walk Test
Directions: Measure the distance patient is able to walk in 2 minutes. No assistance should be used, although a device is allowed.
|
Device used: Timer |
Norm: 77.5 feet
Deviation:
Time Frame (for goal completion): week(s)
|
5-Times Sit-to-Stand
Directions: Time the patient as they stand up and sit down 5 times.
|
Timer |
Age:
Norm: seconds
Deviation:
Time Frame (for goal completion): week(s)
|
Oxygen Cost Diagram
Directions: Ask patient to drag slider such that effort above the slider would lead to breathlessness
Scale Value:
10
7.5
5
2.5
0
Brisk walking uphill
Medium walking uphill
Slow walking uphill
Making the bed
Bathing
Sitting
Brisk walking, level surface
Heavy shopping
Medium walking, level surface
Light shopping
Slow walking, level surface
Standing
Sleeping
Goal Value:
Time Frame:
Barthel Index
Directions: Select the option for each category that best describes the patient.
| Activity | Scoring | |
|---|---|---|
| Feeding |
|
|
| Bathing |
|
|
| Grooming |
|
|
| Dressing |
|
|
| Bowels |
|
|
| Bladder |
|
|
| Toilet Use |
|
|
| Transfers (bed to chair and back) |
|
|
| Mobility (on level surfaces) |
|
|
| Stairs |
|
|
|
||
QuickDASH
| Activity |
No Difficulty |
Mild Difficulty |
Moderate Difficulty |
Severe Difficulty |
Unable | |||
| Open a tight or new jar | ||||||||
| Do heavy chores (e.g. wash walls, floors) | ||||||||
| Carry a shopping bag or briefcase | ||||||||
| Wash your back | ||||||||
| Use a knife to cut food | ||||||||
| Recreational activities in which you take some shoulder force or impact through your arm, shoulder or hand (e.g. golf, hammering, tennis, etc.) | ||||||||
| Activity | Not at All | Slightly | Moderately | Quite a Bit | Extremely | |||
| During the past week, to what extent has your arm, shoulder or hand problem interfered with your normal social activities with family, friends, neighbors or groups? | ||||||||
| Activity |
Not Limited At All |
Slightly Limited |
Moderately Limited |
Very Limited |
Unable | |||
| During the past week, were you limited in your work or other regular daily activities as a result of your arm, shoulder or hand problem? | ||||||||
| Activity | None | Mild | Moderate | Severe | Extreme | |||
| Arm, shoulder or hand pain | ||||||||
| Tingling (pins and needles) in your arm, shoulder or hand | ||||||||
| Activity |
No Difficulty |
Mild Difficulty |
Moderate Difficulty |
Severe Difficulty |
So Much That I Can't Sleep |
|||
| During the past week, how much difficulty have you had sleeping because of the pain in your arm, shoulder or hand? | ||||||||
|
||||||||
Evaluation / Re-evaluation
**See specific tabs for differences between PT & OT evaluation forms
+ Document Date / Time

Patient Identity Confirmed: Must be checked on EVERY document submitted, even if the patient is already known to you.
Times: Times present MUST be in military format (e.g. "1:00 PM" is "13:00"). Must be inputted to save document.
Date: This is the date of the visit, and MUST match the date in your HotBox. Must be inputted to save document. If you get an error while saving, contact the office prior to completing the rest of the document.
Mileage: Can be left blank.
HCPCS: These are automatically generated--make sure that the location dropdown on the right matches the location the patient is treated. This is needed for billing.
+ Diagnosis / History
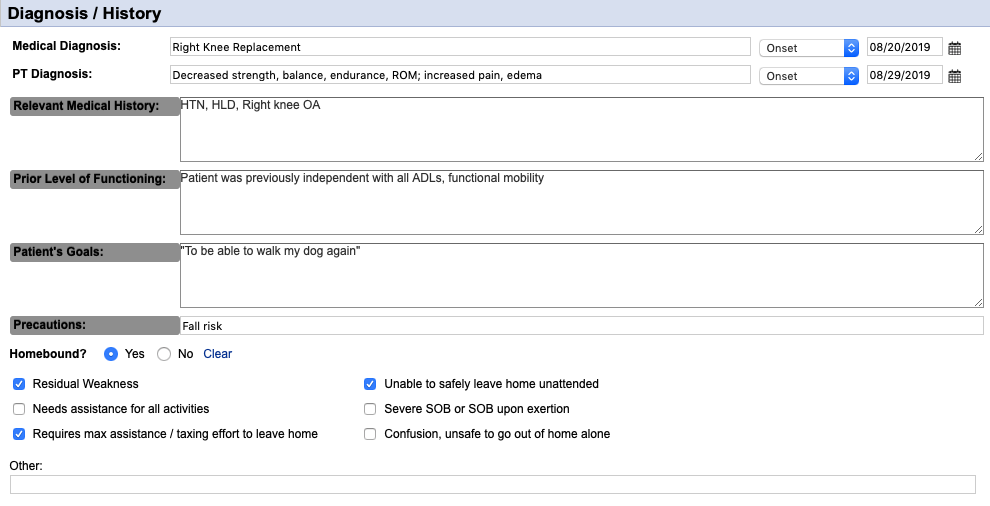
Medical Diagnosis: The medical reason the patient was admitted to services. The date of onset is the onset of the condition (e.g. date of initial hospitalization) or "Exacerbation" may be selected and can be the date of admission to the agency, hospital admission, etc.
PT Diagnosis: This is YOUR reasoning for seeing the patient. May be as simple as "Generalized Weakness" or "Difficulty in Walking". Date of onset should be your evaluation date.
Relevant Medical History: This is your PMH section--just list out the patient's diagnoses that are applicable to your care.
Prior Level of Functioning: This should just be a simple statement. If patient previously had deficits, such as walking with a cane or assistance was needed with ADLs, you can put that here as well
Patient's Goals: This is what the PATIENT wants to get back to doing. Using a quote from the patient simplifies this, but isn't necessary.
Precautions: Fall risk is the number 1 reason we're seeing a patient most of the time, so it should be on most of your documents. Also include hip precautions, sternal precautions, etc. as applicable.
Homebound: Always answer "Yes" to this. "Requires max assistance / taxing effort to leave home" should ALWAYS be checked, along with at least one other checkbox. The "Other" section might include information, say if a patient has a psych diagnosis that impairs leaving home
+ Social Supports / Safety Hazards

Current Types of Assistance Received: In this box, just put who is assisting and their availability. Family, friends, paid caregivers would all be listed here. If they live in a PCH/ALF, then you can put "Staff at PCH" or whatever seems appropriate.
Safety / Sanitation Hazards: Check all that apply. Steps / Stairs is non-specific, so input what makes the most sense to you based on your assessment.
Evaluation of Livin Situation, Supports, and Hazards: This section is regarding the specific setup of the patient's home environment. Stairs and bedroom/bathroom locations are important to note as well as any other potential areas that could have an effect on treatment (e.g. a gravel driveway will mean that instruction in ambulation on uneven surfaces is relevant to the patient).
+ Vital Signs & Subjective Information
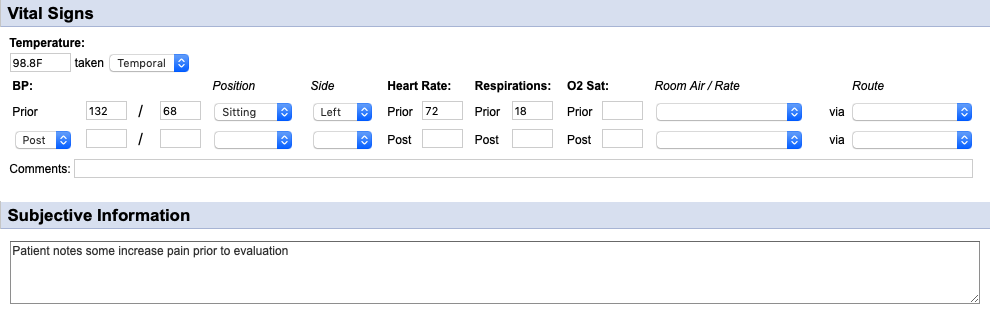
Temperature: Should be taken when a potential for infection is present (e.g. open wounds, suspected UTI or other possible infection).
Blood Pressure: Needs to be taken prior to treatment, ensuring that the "Position" and "Side" drop-downs are also selected.
Heart Rate: Needs to be taken prior to treatment.
Respirations: Needs to be assessed prior to treatment.
O2 Saturation: Can be taken as per clinical judgement. Orders for this are no longer needed. Be sure to select the "Room Air / Rate" and "Route" drop-downs to the right.
Comments: **IMPORTANT: If any of the vital signs are outside of agency parameters, they must be addressed and the communication should go here (e.g. SN made aware, PCP called regarding HTN, etc).
Subjective Information: Quick assessment of patient's overall current status.
+ Physical Assessment
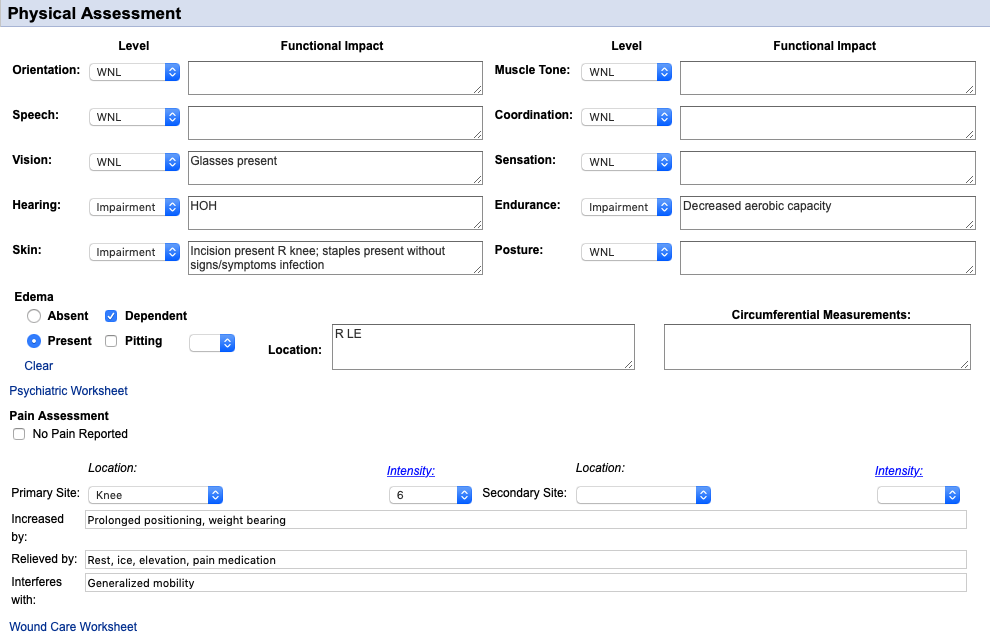
Systems Assessment: Select one of the responses in each drop-down and note any anomalies in the corresponding text box.
Edema: Must select "Absent" or "Present" and input the location. Other areas are not necessary for the majority of patients.
Psychiatric Worksheet: This link is just stuck in there and is easily missed. If there's a psych diagnosis that may affect treatment, this can be filled out but is not necessary.
Pain Assessment: Must be completed every visit (select "No Pain Reported" if there's no pain). Fill out all the corresponding boxes.
Wound Care Worksheet: Like the psych assessment, this is stuck randomly in between items. This is only necessary to fill out if there are current wounds being addressed by the agency and your discipline is assessing them.
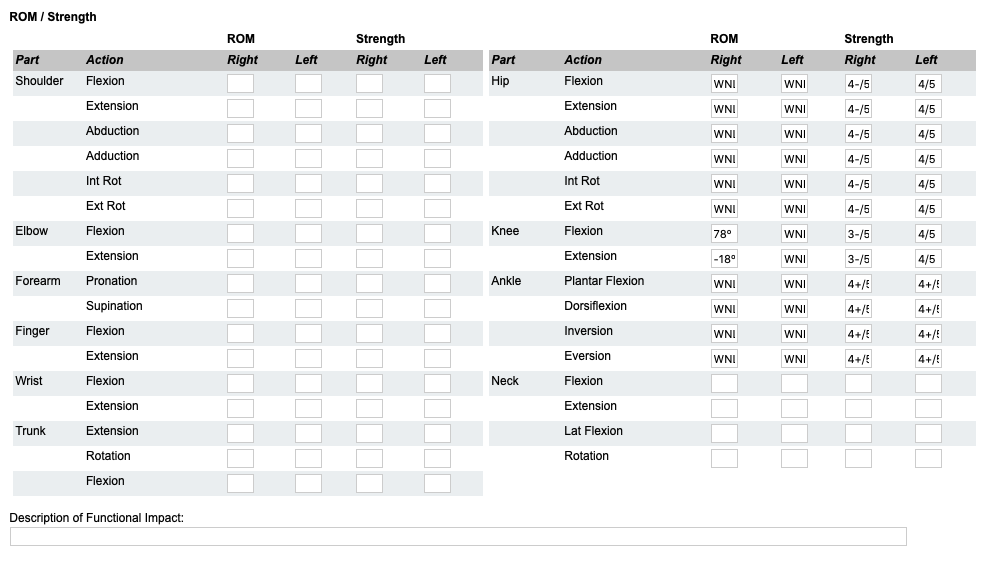
ROM / Strength: This needs to be filled out for the body parts that will be worked on--for PT, usually lower extremity. WNL or WFL is acceptable for ROM. OT is much more limited with just the upper extremity section.
+ DME

Available: Check off all that apply. In the "Other" section add whatever else they have. The OT section has slightly different selections.
Needs: Input any devices that are needed for safety. For these, make sure to note where these are coming from (e.g. PT to order, DME company is delivering this week, patient's sister is providing).
+ Narrative
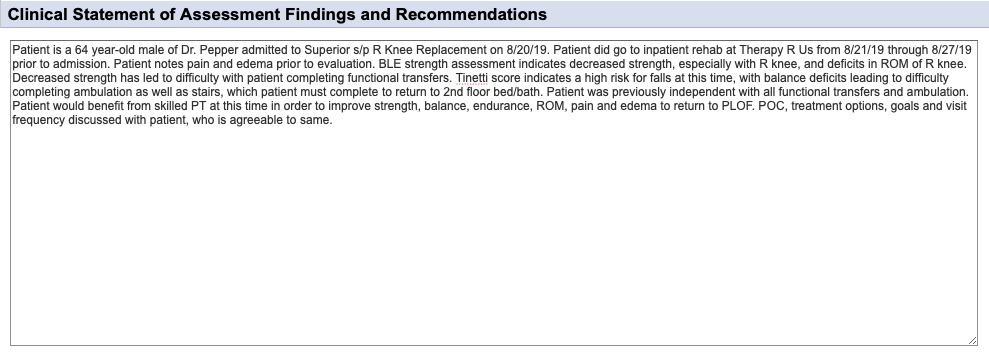
Patient information: Age, gender and the doctor ordering therapy.
Reason for Admission: Medical diagnosis resulting in hospitalization or for ordering home health services and dates.
Admission Information: Include hospital and dates (if applicable); inpatient rehab and dates (if applicable).
Relevant Information: Include details such as presence of pain, edema, stiffness, ROM issues, mobility difficulties since arriving home, etc.
Therapy Assessment: Include deficits found in assessment. Specifics such as numbers found during testing are NOT needed, but the outcome is; what does fall risk score indicate; what deficits in mobility do these cause?
PLOF: Where was patient at prior to admission to hospital / visit with physician and, if different, what are the basic goals (e.g. "Patient was previously independent with ambulation, but will likely be mod I with RW due to ongoing deficits from CVA.").
Therapy Plan: Will patient benefit from therapy? What deficits will be addressed? Include the statement "to return to PLOF" or "maximize functional mobility" or similar to indicate why this treatment is medically necessary.
Patient involvement in POC: Blanket statement indicating that the patient was involved in the POC and goal formation and that they're agreeable to the finalized treatment plan.
**Insurance companies tend to ONLY look at narratives when quickly reviewing notes; narratives also provide the office staff with a quick look to get authorization so make sure all pertinent information is present!
+ Treatment Goals and Plan (Goals and Interventions)
When filling out this section, the "Interventions" are what was previously called the "Orders" prior to changes from CMS.
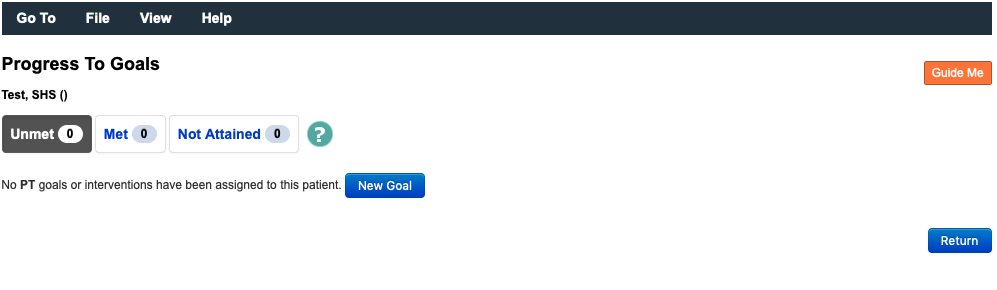
Select the blue "Update Goals and Interventions" button to add

A page will open and your current evaluation will be saved. Click the blue "New Goal" button to add a goal.
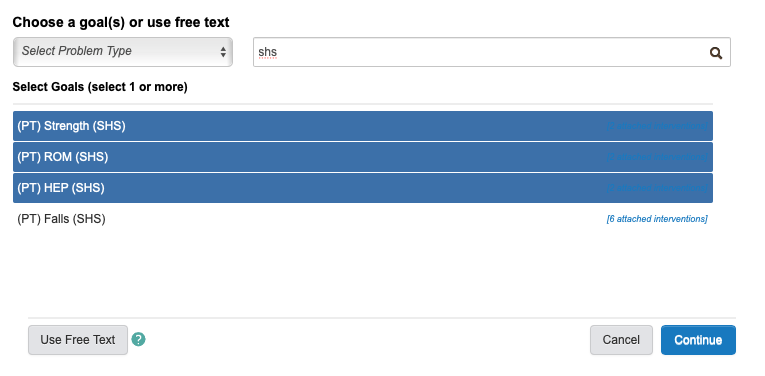
A page will pop-up over the original to allow you to select goals. In the example, "shs" has been typed into the search bar to bring up relevant goals that are sanctioned by the agency. You'll be able to do this by discipline ("phys" for PT; "occ" for OT; "speech" for ST). These are suggested goals, and are by far not all inclusive. You can search for other goals or enter free text by clicking the button in the bottom right corner.

This image shows that you can select multiple goals at once by clicking each. Clicking a second time will remove the goal. By clicking "Continue" all highlighted goals will be added.
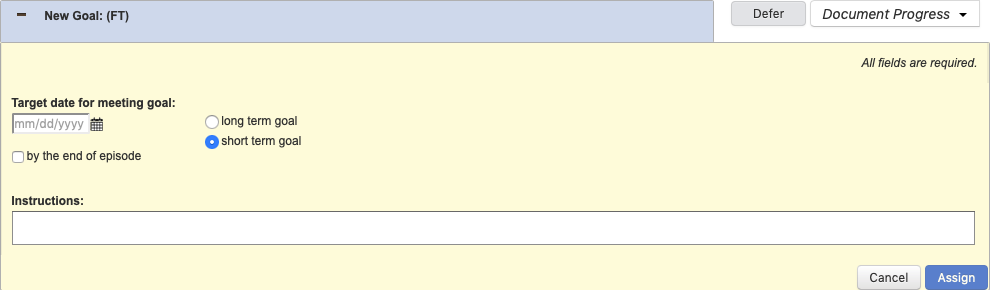
If you have selected a "Free Text" goal, this screen will be shown. Under the "Instructions" section, type in your goal and select "Assign". You will have to manually add interventions.
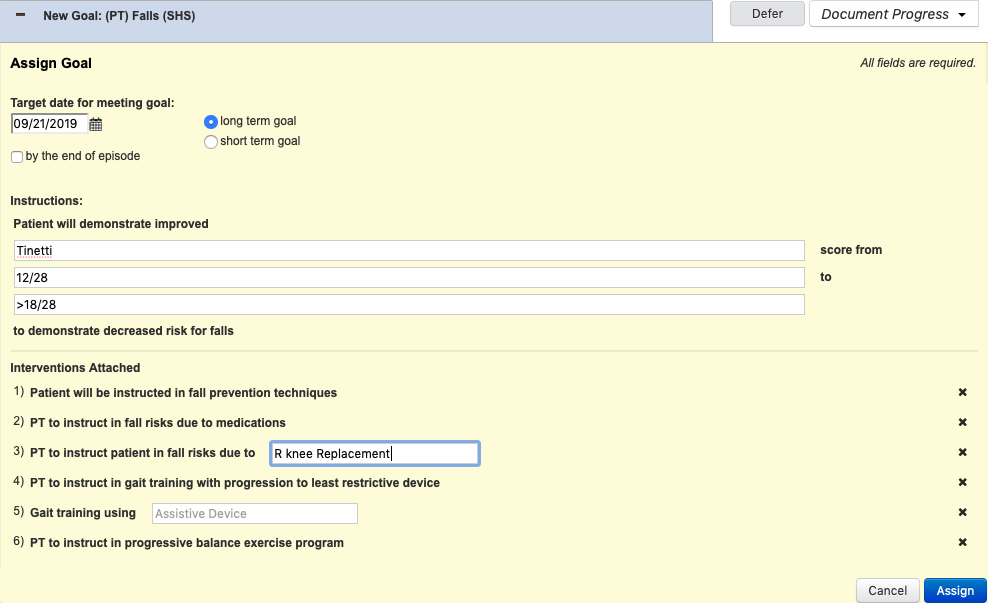
The fall risk goal is shown as an example. Any white box is required to be filled in. At the top, the date section must be filled in along with the term of the goal. Selecting "by the end of the episode" will fill the date box in with the last date of the certification period. In this example, you would fill in the standardized test, the initial measurement and the goal measurement. Suggested interventions are present below the goal. Clicking the "X" on the right of the intervention will remove it from the list. Once completed, click the blue "Assign" button.
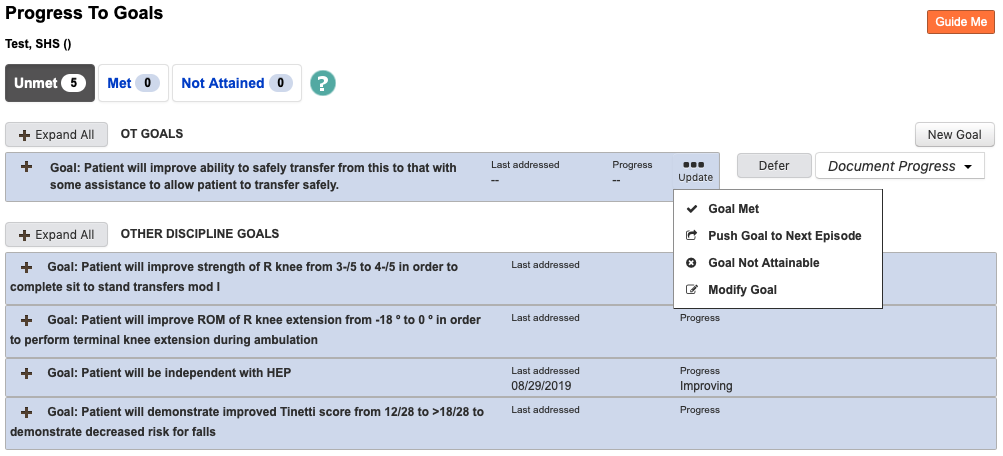
Once assigned, the goal will appear as in the picture (screen shot is not for the same goal). The green "Perform" button will allow you to select which intervention is performed during the visit.

Once the "Perform" button is selected, this screen will come up. You must select who the intervention was performed on and the result of the instruction. Notes should be left blank.

After all the interventions are performed (as applicable--a minumum of one intervention must be performed to demonstrate working on the specific goal), you will return to the goal. Clicking the "Document Progress" button on the upper right side will allow you to select patient progress toward the goal. In the "Goal Progress Notes" section that pops up, here is where you can provide more information on the interventions performed. Click "Submit" on the bottom right to save.

Now that the goal has been addressed, this screen will come up. Note that the "Goal Progress Notes" section appears here above the interventions. Each visit more notes are added here, allowing you to visualize the patient's progress. After all goals are addressed to your satisfaction, click the blue "Return" button on the bottom right.

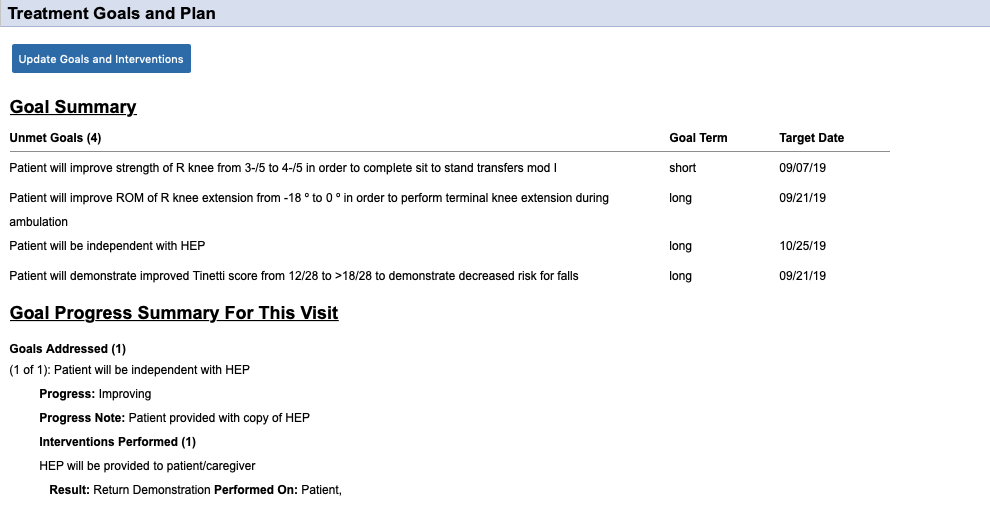
You are now returned to your evaluation page. Whereas the "Treatment Goals and Plan" section was previously blank, you will now see the goals added and interventions performed.
Select the blue "Update Goals and Interventions" button to add
A page will open and your current evaluation will be saved. Click the blue "New Goal" button to add a goal.
A page will pop-up over the original to allow you to select goals. In the example, "shs" has been typed into the search bar to bring up relevant goals that are sanctioned by the agency. You'll be able to do this by discipline ("phys" for PT; "occ" for OT; "speech" for ST). These are suggested goals, and are by far not all inclusive. You can search for other goals or enter free text by clicking the button in the bottom right corner.
This image shows that you can select multiple goals at once by clicking each. Clicking a second time will remove the goal. By clicking "Continue" all highlighted goals will be added.
If you have selected a "Free Text" goal, this screen will be shown. Under the "Instructions" section, type in your goal and select "Assign". You will have to manually add interventions.
The fall risk goal is shown as an example. Any white box is required to be filled in. At the top, the date section must be filled in along with the term of the goal. Selecting "by the end of the episode" will fill the date box in with the last date of the certification period. In this example, you would fill in the standardized test, the initial measurement and the goal measurement. Suggested interventions are present below the goal. Clicking the "X" on the right of the intervention will remove it from the list. Once completed, click the blue "Assign" button.
Once assigned, the goal will appear as in the picture (screen shot is not for the same goal). The green "Perform" button will allow you to select which intervention is performed during the visit.
Once the "Perform" button is selected, this screen will come up. You must select who the intervention was performed on and the result of the instruction. Notes should be left blank.
After all the interventions are performed (as applicable--a minumum of one intervention must be performed to demonstrate working on the specific goal), you will return to the goal. Clicking the "Document Progress" button on the upper right side will allow you to select patient progress toward the goal. In the "Goal Progress Notes" section that pops up, here is where you can provide more information on the interventions performed. Click "Submit" on the bottom right to save.
Now that the goal has been addressed, this screen will come up. Note that the "Goal Progress Notes" section appears here above the interventions. Each visit more notes are added here, allowing you to visualize the patient's progress. After all goals are addressed to your satisfaction, click the blue "Return" button on the bottom right.
You are now returned to your evaluation page. Whereas the "Treatment Goals and Plan" section was previously blank, you will now see the goals added and interventions performed.
+ Treatment Goals and Plan (Miscellaneous)

Care Coordination: The checkbox for "Physician Notified RE: Plan of Care..." MUST be checked on all evaluations (even eval-only). The communication part should include anyone that you've involved during your visit.
Statement of Rehab Potential: For any evaluation where further visits are planned, "Yes" should be checked; for evaluation-only "No" should be checked.
Treatment / Skilled Intervention This Visit: The checkbox for "Completion of the evaluation..." MUST be checked on all evaluations (even eval-only). The "Other" section is actually regarding other skill provided, which is already present from the "Goals and Interventions" if any interventions were performed. This can be completed as needed, or leave unchecked.
Frequency and Duration: The current episode's start and end dates autofill. The effective date is the date of the evaluation. Frequencies should be listed out in the "# w #" format. The "Next Episode" section will only be used if the evaluation is performed in the last 5 days of the certification.
+ Discharge Plan
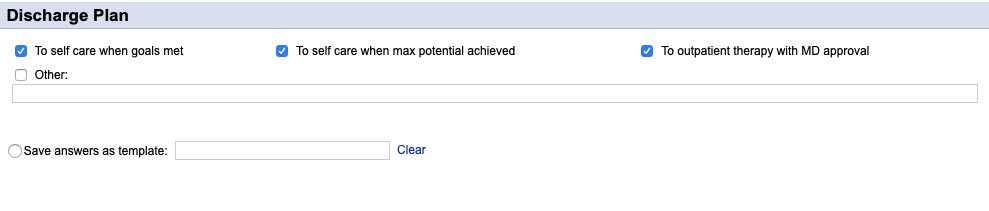
Checkboxes: Select all that apply. Other is frequently used in place of these (e.g. "To staff at PCH when goals met / max potential reached" or "To care of family when goals met").
Templates: You can elect to save the evaluation as a template for future use. For instance, if you see a lot of knee replacements you could entitle this "TKR" and have it available and just modify it as needed the next time you have a new knee replacement patient.
PT Evaluation - Functional Assessment

Bed Mobility: All boxes should be completed ("Factors contributing..." box can be left blank) UNLESS patient is not sleeping in bed and then that can be stated in the "Factors contributing..." box.
Gait: Assist Level should be filled in and if not tested, put that into the box. If something is not tested, provide an explanation in the box.
Transfer: All boxes should be completed, although the wheelchair section can be left blank (unless they're using a wheelchair). If OT is present, you can put "OT to assess" in the toilet/tub sections. Again, if not tested, input that in the assist level and explain in the "Factors contributing..." box.
Wheelchair Mobility: Only should be completed if patient is using a wheelchair for mobility (may or may not include a transfer chair at clinician's discretion).
Weight Bearing Status: Should be filled out for all patients without exception.
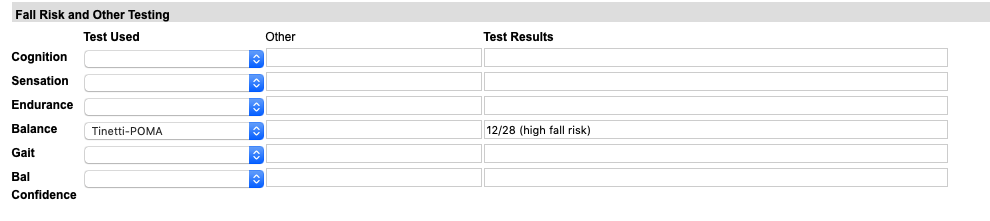
Fall Risk and Other Testing: At LEAST one standardized test needs to be completed in this section and for use as a goal (bedbound patients may not be able to complete, but this can be noted below). Other sections may be left blank.
OT Evaluation - Functional Assessment
Balance: Complete all 4 drop-down boxes.
Bed Mobility: All boxes should be completed ("Factors contributing..." box can be left blank) UNLESS patient is not sleeping in bed and then that can be stated in the "Factors contributing..." box.
Transfer: All boxes should be completed. Again, if not tested, input that in the assist level and explain in the "Factors contributing..." box.
Self Care Skills: Fill in each of the "Assist Level" boxes completely--you may want to copy and paste instead of writing each of these in. The "Assistive Device" boxes can be blank if no device is used.
Instrumental ADLs: Same as the info for "Self Care Skills" above.
Motor Coordination: All areas should be completed. The "Prior to Injury" section can just be "WNL" if this was the case; if not then put something like "Decreased due to..." and why it was decrease (e.g. Stroke).
Fall Risk and Functional Testing: At LEAST one standardized test needs to be completed in this section and for use as a goal. Other sections may be left blank.
Cognitive Status / Perception: All drop-down boxes should be completed here.
PT Visit
**Your evaluation visit should carry over into your visit notes. The following starts in the "Objective Information" section.
Training Exercises: This is my least favorite section by far. There used to be just an open comment section to input these... This will carry over to the next note, so filling it out on the first visit after the evaluation is somewhat tedious but will help. You're limited to 8 exercises. If you need more space, just put them in the "Impact of Exercise(s)..." box at the bottom. You won't be using this box anyway, as you'll see in the next section.
Update Goals and Interventions: Just like you did in the evaluation, you're going to go into the Progress to Goals section and perform interventions and update the goals. At EVERY visit, at least one intervention should be performed and that goal updated. You will likely be performing multiple interventions and can do as many as you'd like.
Summary of Patient Overall...: This is the "Assessment" section from your SOAP note. Here you would put "Patient tolerated treatment well" or "Patient experienced increased pain in..." and that's it. The actual instruction provided will be in the "Goals and Interventions" section.
Intervention Complete: The blue icon to the left of the intervention denotes how many times that specific intervention was performed. You can perform this many times throughout the episode and the number will increase each time. If at any point you feel that that intervention has been med, you can choose "Intervention Completed" and it will mark it as such. However, you will not be able to change that once it's done and it cannot be added back in.
Document Progress: For any interventions that have been completed, make sure to use the "Document Progress" drop-down for the goal to show progression. Under the "Goal Progress Notes" is where you'll want to document specifics. In the case of the picture, you can write something as simple as "Repetitions progressed" or "Standing Marching added". It helps to show what exactly was improving as of that visit.
Update Goal: You'll notice when you're updating the goals that there's an option for "Goal Met". This can be completed at any time, during any note. You will not be able to change that once you select it, however.
OT Visit
**Your evaluation visit should carry over into your visit notes. The following starts in the "Objective Information" section.
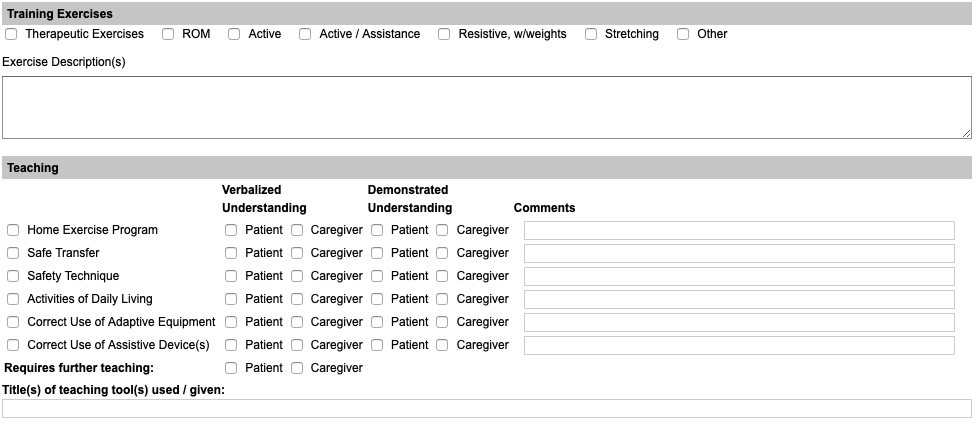
Training Exercises: For this section you'll simply select whatever checkboxes are appropriate and then enter the exercises into the "Exercise Description(s)" box. Don't forget to put the name, sets and reps of each, and if any resistance was use (e.g. "Rows 2x10 with Green Band").
Teaching: This one's pretty much just check off what was done and the patient's response. Don't forget to check one of the boxes under "Requires further teaching". Don't worry about the "Title(s) of teaching..." section.
Update Goals and Interventions: Just like you did in the evaluation, you're going to go into the Progress to Goals section and perform interventions and update the goals. At EVERY visit, at least one intervention should be performed and that goal updated. You will likely be performing multiple interventions and can do as many as you'd like.
Additional Narrative Summary: (Same box as "Summary of Patient Overall Performance..." seen in the picture, just a different name OT versus PT visit). This is the "Assessment" section from your SOAP note. Here you would put "Patient tolerated treatment well" or "Patient experienced increased pain in..." and that's it. The actual instruction provided will be in the "Goals and Interventions" section.
Intervention Complete: The blue icon to the left of the intervention denotes how many times that specific intervention was performed. You can perform this many times throughout the episode and the number will increase each time. If at any point you feel that that intervention has been med, you can choose "Intervention Completed" and it will mark it as such. However, you will not be able to change that once it's done and it cannot be added back in.
Document Progress: For any interventions that have been completed, make sure to use the "Document Progress" drop-down for the goal to show progression. Under the "Goal Progress Notes" is where you'll want to document specifics. In the case of the picture, you can write something as simple as "Repetitions progressed" or "Standing Marching added". It helps to show what exactly was improving as of that visit.
Update Goal: You'll notice when you're updating the goals that there's an option for "Goal Met". This can be completed at any time, during any note. You will not be able to change that once you select it, however.
Discharge Evaluation & Discharge Summary
**This document should be bundled into a 2-page document for PT & OT

Functional Assessment: Each section will look like this. If you had an initial assist level, make sure there's a discharge assist level.
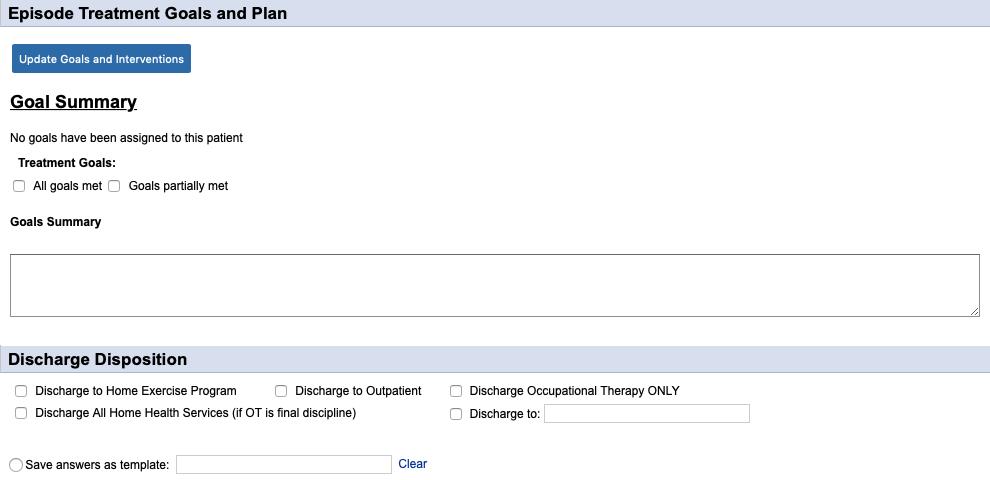
Treatment Goals and Goals Summary: These are only in the OT document, and just weren't removed with the addition of the Progress to Goals section. Leave these blank.
Discharge Disposition: Select all that apply.
Goals and Interventions: Make sure that all goals are marked as "Met" or "Unattainable" at discharge!
**The discharge summary is mostly self-explanatory. Ask if you have questions!
Discharge Order
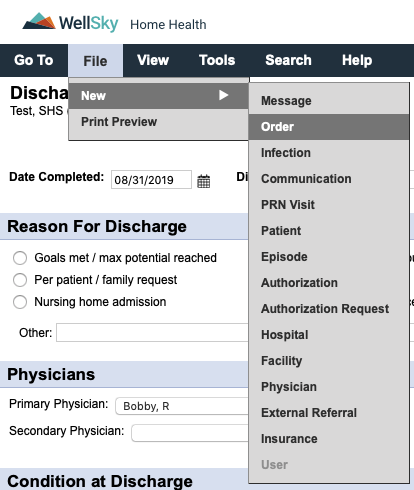
While in the patient's chart of your document, follow the menu prompts in the picture. If you do this from your Hotbox, you will have to select the patient and the physician. There are thousands of physicians in the system. Don't do that to yourself.
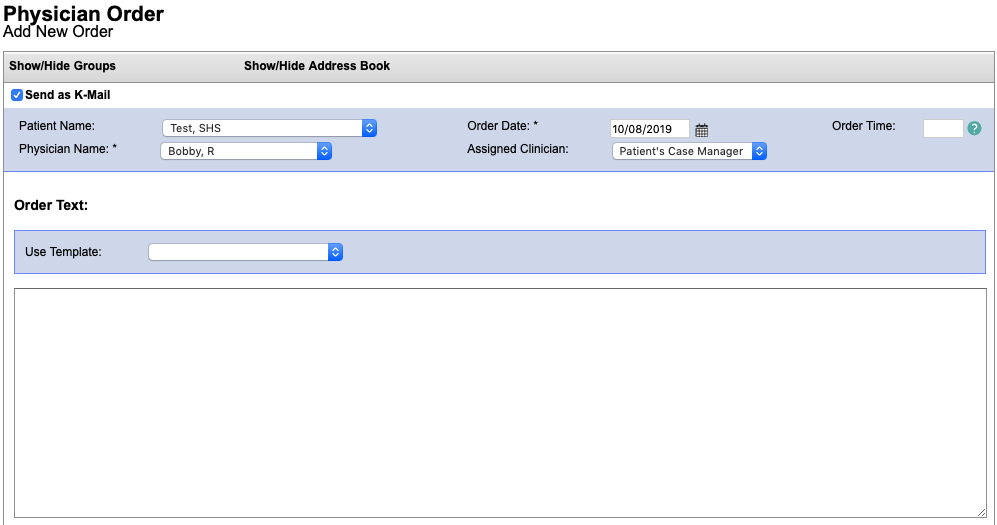
Order Date: Defaults to the current date. Change this to the discharge date if needed.
Order Time: A time is needed by PA state law. If you don't put a time in, it defaults to the current date/time once signed and will be sent back for corrections.
Order Text: Same as our paper orders. "Discharge from PT with goals met" or something like that.
Recertification Process
**Your Evaluation document (Re-evaluation or Evaluation, depending on the circumstance) must be included in the last 5 days of the certification period. This includes transitioning patients from paper to Kinnser.
Goal Update: To continue into the next certification period, the goals have to also be carried over. To do this, you need to go to any active goals present, select "Update" and select "Push Goal to Next Episode".
Document Status
The document status can be found in two places: attached to the patient's chart or in your HotBox. It will only show up in your
HotBox if the document is currently assigned to you, otherwise it can be viewed in the patient's chart at all times.
Not Yet Due: The document's target date is still within the Medicare workweek and does not yet need to be completed.
Not Started: The document's target date is from a previous Medicare workweek and should have already been completed.
Saved: The document has been started, but is not yet signed by the clinician. Progress can still be viewed in the Print Preview.
Submitted to Case Manager: The document has been signed by the clinician and sent to the case manager for review.
Returned for Signature: Minor corrections have been fixed in the document by the case manager and the clinician signature is required for completion.
Returned for Review: Major corrections are needed and need to be addressed by the clinician (see "Corrections" section for details) prior to completion.
Completed: The document has passed clinical review and has been signed by the clinician. No further changes can be made (unless Reopened by the case manager).
Reopened: The case manager has reopened a document for changes to be made. This cannot be done once a document has been sent to the physician for signature.
Sent to Physician: The document has been faxed to the physician's office for review and signature.
Returned by Physician: The document has been signed and returned by the physician.
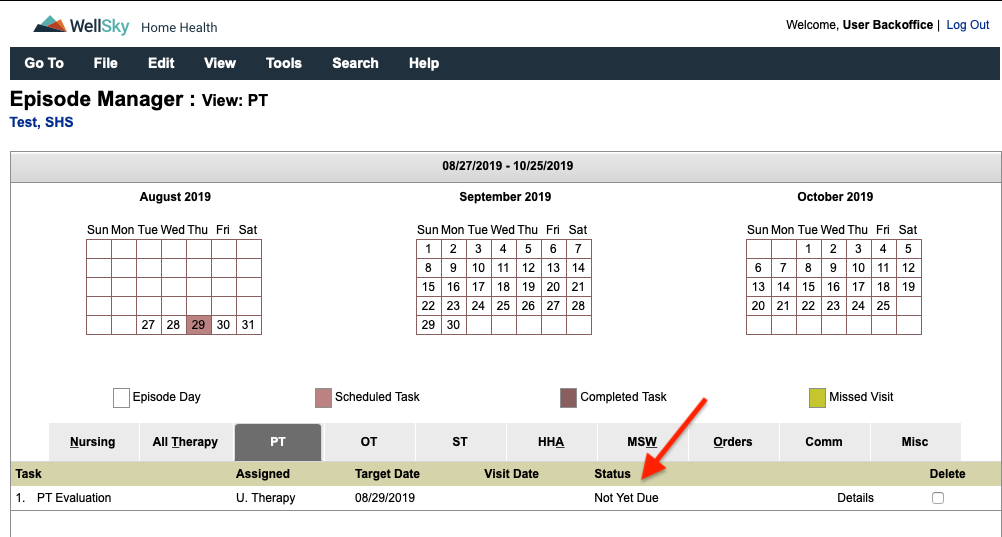
Corrections
When a document is marked "Returned for Review" there should be a sticky note attached. The sticky note can be viewed in the HotBox as shown below. Hovering the mouse over or tapping on the sticky will bring up the information.

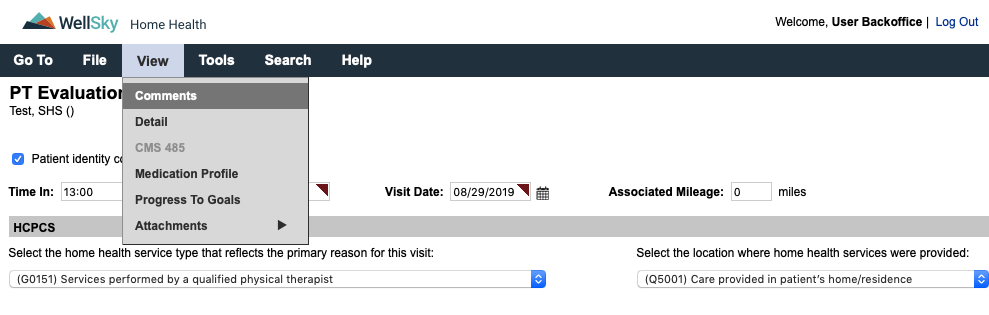
There is a much easier way to view the comment, which will also allow you to switch back and forth between the comment window and the note. First, you're going to open the document by selecting it from your HotBox. You'll select "View" and then "Comments" from the navigation bar.
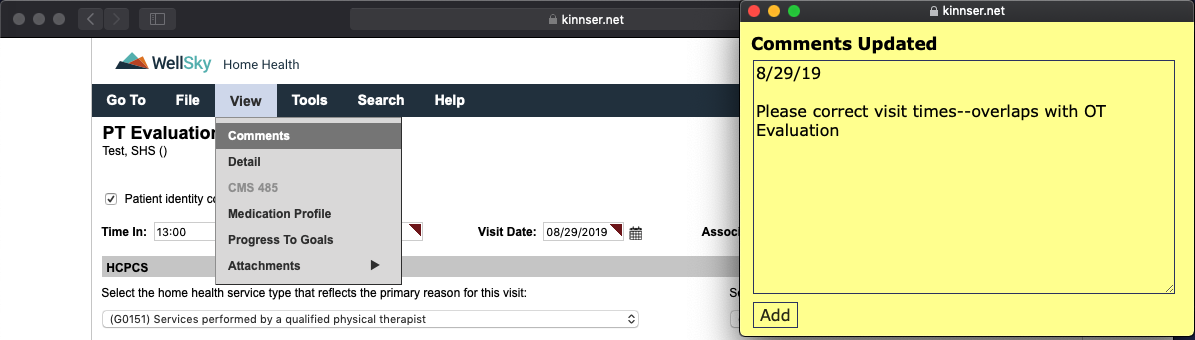
This opens the comments up into a separate window. The comment will include any necessary corrections, and you can add to this if needed by typing in the box and clicking "Add".
Comments can also be viewed by hovering over with your mouse or tapping on the yellow asterisk in the patient's chart.

There is a much easier way to view the comment, which will also allow you to switch back and forth between the comment window and the note. First, you're going to open the document by selecting it from your HotBox. You'll select "View" and then "Comments" from the navigation bar.
This opens the comments up into a separate window. The comment will include any necessary corrections, and you can add to this if needed by typing in the box and clicking "Add".
Comments can also be viewed by hovering over with your mouse or tapping on the yellow asterisk in the patient's chart.
Task Flow
1) The referral is received from the hospital or physician's office
2) The admission visit is scheduled onto the nurse of PT and therapy evaluations are scheduled into the system.
3) Once the initial evaluation is submitted by the clinician (all corrections do not have to be completed at that time), visits are added.
4) Each note is reviewed by a case manager for completion. If corrections are needed, this is sent back to the clinician.
5) As visits are being scheduled out, re-evaluations are added in by the scheduler to ensure completion within the 30-day window. A comment will be added if the 30 days falls prior to the end of the Medicare workweek.
6) The last scheduled visit will be inputted as a discharge by the scheduler. If continuing, you will have to ask the scheduler to change the visit.
HotBox

1) Yellow Sticky: Visit comment; is only visible on the specific document. Tap/hover to view.
2) Purple Sticky: Episode comment; is visible on every document during that certification period. Tap/hover to view.
3) Green / Red House: Signature capture; red means the signature has not been captured (visible only on tablets) and green means that it has (visible on all systems). Tap/click to view.
4) Orange House: Missed Visit; used if a visit is missed and cannot be rescheduled during the Medicare workweek. Tap/click to complete.
5) Scheduled Date: Date the document is currently scheduled for.
6) Scheduled Date: When selected, the document can be moved to another day during the Medicare workweek.
Anatomy of a Narrative (Evaluation)
The narrative of an evaluation tells the story of a patient's past and current function. The idea here is to paint a picture
of what the patient looks like right now versus their past, prior to the current evaluation. Not only should the functional status
be explored, but also barriers to rehabilitation (such as cognitive issues due to dementia, behavioral issues due to a
psychological illness, etc) and a household assessment. Details provided here form the basis for not only
why the patient is being seen, but also the complete potential for rehabilitation.
There are certain key features to assess in the narrative, not all of which are encompassed in the actual documentation:
The following is an example narrative for Jane Doe, a 94-year-old being admitted after stent placement
There are certain key features to assess in the narrative, not all of which are encompassed in the actual documentation:
• Patient demographics -- these include PMH, current reason for evaluation and psychological/emotional barriers to rehabilitation
• Housing -- what is the patient's current setup? Do they live in a 2-story home but sleep on the first floor (e.g. unable to complete stairs) or does the bathroom have a high tub that prevents the patient from getting in and out of the shower? Are there additional devices that may be necessary for household safety? Even if a patient declines any devices, documenting that shows that there was effort put forth to improve patient safety
• Patient's functional status (strength, balance, endurance) and how it relates to the patient's condition
• Functional testing -- these tests provide a base for showing progress, but what do the results mean for the patient? If a patient has a low Tinetti score, how does the increased fall risk change the functional status -- i.e. does their balance deficit result in the inability to safely transfer, to complete safe ambulation? At LEAST one functional, standardized test should be included whenever possible (there are some cases that it might not be, but document that)
• PLOF -- the end of the note always states something along the lines of "...to return to PLOF." Rarely do we define what that is. Was the patient independent with transfers, ambulation, stairs, ADLs, IADLs? Did they need assistance, but currently need more assistance? This area is setting the stage for why we have the goals that we do.
• Patient's goals -- while we have our functional goals, there should be a statement as to what the patient is looking forward to getting back to. Easiest way is to make a declarative statement i.e. "Patient states 'I just want to be able to return to my crocheting again.'"
• Patient instruction -- every note should have 2 teaching topics, along with patient response
• Finally, the summation piece -- were the POC, treatment options, goals and visit frequency discussed with the patient and are the agreeable?
The following is an example narrative for Jane Doe, a 94-year-old being admitted after stent placement
Patient is a 94-year-old female of Dr. Pepper being seen for physical therapy evaluation s/p hospitalization for
cardiac stent placement at CMC with subsequent rehabilitation x4 weeks at Allied. Patient identified prior to
assessment by medical charts left in the home and is known to clinician. Patient lives in a 2-story home with 6 steps to enter
and no railing present. Patient has 12 steps to the 2nd floor of the home with a single railing. Bedroom and only bathroom
are present on the 2nd floor, and patient is currently sleeping in a recliner on the first floor of the home. Patient has a
lift chair, BSC and SPC present in the home. Bathroom present has walk-in shower along with built-in bench and
hand-held shower head, with single grab bar and appears safe for patient, although further assessment is indicated
once patient is able to safely navigate the 12 steps to the bathroom. Patient denies pain at this time. BLE strength assessment indicates generalized
weakness due to deconditioning, which limits patients ability to safely complete functional transfers and patient has been
using the lift chair to complete sit<->stand. Tinetti assessment indicates a high risk for falls at this time, with
balance deficits leading to decreased ability to complete safe ambulation. Patient is currently ambulating with SPC x20 feet
in the home and is unsteady on her feet with the device. Patient would benefit from RW at this time to decrease risk for falls.
Patient agreeable to device and order will be coordinated between Dr. Pepper and Andrew Brown's. Diminished endurance is also
present, leading to patient being unable to complete stairs in the home. Patient was previously mod I with SPC for household
ambulation and completed 12 stairs with SPC/rail; required Supervision for showering, which was provided by daughter-in-law.
Patient states that she would "like to be able to shower again" in the near future. Patient instructed in ordering process
of RW, which may take 2-3 days to arrive, as well as safety with during ambulation to be aware of changes in flooring surfaces
to decrease risk for falls. Patient demonstrated understanding of same, but requires further teaching for ambulation safety.
POC, treatment options, goals and visit frequency discussed with patient, who is agreeable to same. Patient would benefit from
skilled PT at this time in order to improve strength, balance and endurance to return to PLOF.
Anatomy of a Narrative (Routine Visit)
Routine visit notes should not be nearly as involved as evaluation narratives. They basically follow the typical
SOAP note format, which can even be used if preferred so long as all the following items are included:
Here's an example of a daily note:
• Subjective: How is the patient feeling, any pain, any changes since last visit? Patient identification
• Objective: What was completed during the visit? List all exercises, set, reps; any manual therapy; ultrasound and anything else that may have been completed.
• Assessment: What was the patient's response to treatment? What teaching occurred, and what was the patient's response to the treatment? Does the patient require further instruction and why
• Plan: Why is continued therapy needed?
Here's an example of a daily note:
Patient seen for physical therapy follow-up visit. ID through self-identification and is known to clinician. Patient denies
pain at the time of visit, but notes soreness following last session which resolved by the next day. Patient able to complete
treatment as prescribed, including sitting LAQ, marching, abduction with red band 2x10 each; standing heel raises, marching
x10 each; gait training 2x75 feet with SPC, verbal cues for proper heel strike during ambulation. Patient demonstrated fatigue
with treatment. Instructed in progression of HEP with addition of standing exercises as well as how heel strike provides
proper momentum for energy conservation during ambulation. Demonstrated understanding of same. Patient would benefit from
continued skilled PT in order to continue to improve strength, balance and endurance to return to PLOF.
Medications
Are PTs and OTs allowed to complete medication teaching and medication orders?
Medication orders: According to both the APTA and PPTA, physical therapists are allowed to write orders for medications,
document teaching/instruction in medications and reconcile the medication lists. That being said, as a clinician, you
should only do what you're comfortable with. If there is a new/changed medication and it's outside of your comfort
zone to instruct in it, send a message to the nurse. Document in a communication that there was a change to the
medication list and that you contacted the nurse regarding this. If there is no nurse present and you think that the
change warrants a nurse, just notify the office and a nurse can always be brought in on the case. If you are comfortable
with the medication, just make sure to document instruction in the dose, effects of the medication, possible side effects.
For OTs and medications, it is unclear if this is within the scope of practice (at least to me--if your experience is different, by all means let me know!) To be safe, defer to nursing.
A discrepancy was found while reconciling the medications--what should I do?
For OTs and medications, it is unclear if this is within the scope of practice (at least to me--if your experience is different, by all means let me know!) To be safe, defer to nursing.
First step is to check the severity of the interaction. If it is a food or alcohol interaction, teaching is all that's
needed. If it's drug-to-drug or a duplication, the pharmacy and PCP should be notified along with the nurse. If there's
no nurse in on the case, then you'd be responsible to make sure that this is rectified or for ordering a nursing assessment.
When in doubt, notify the doctor and pharmacy and/or call the office to speak to a CM. Just make sure to document these
communications to CYA!
Labs / Blood work
Are therapists allowed to take physician orders for testing?
Short answer: no. We cannot take these orders or write these orders for the nurse to take them. If a physician is ordering
homebound labs to come in, you only need to document this if the labs are somehow relevant to your treatment. I had a case
where a patient had a suspected UTI for a PT-only case, which did impact treatment due to altered mental status, and the patient completed the
testing at an outpatient lab. I documented that the physician was made aware of the signs/symptoms of the UTI, that the
urinalysis was ordered and the results when they came back and added the medication for the patient med list, which was
a simple broad-spectrum antibiotic so I was able to comfortably do the instruction on the med.
The "long" answer: things are rarely direct. Theoretically, the physician should call the office with an order for any lab testing. However, I'm in serious doubt that if you told the physician this when you actually got them on the phone that they would be willing to do so. Write down what they tell you and let the CM know in the office. They can always call back to verify the order (and they should do so), but it's outside of our scope of practice since we do not draw the blood or handle specimens.
The "long" answer: things are rarely direct. Theoretically, the physician should call the office with an order for any lab testing. However, I'm in serious doubt that if you told the physician this when you actually got them on the phone that they would be willing to do so. Write down what they tell you and let the CM know in the office. They can always call back to verify the order (and they should do so), but it's outside of our scope of practice since we do not draw the blood or handle specimens.
Evaluation Only
How do I complete an eval-only visit?
The evaluation part of the eval-only assessment is exactly the same--you want to make sure your documentation backs up
that the patient is eval-only. Similarly, if the patient is eval-only because they refuse further PT, document just as
if they need PT to show that it's actually needed and that the patient is refusing despite this.
Discharge Order: Complete a new physician order stating that the patient is discharged from therapy service and is an evaluation only.
Communication Note: In the communication note for the therapy frequency, input "1w1" or "1d1" and state that it's an eval-only so that the CM/Supervisor are made aware.
Narrative: You must include a statement that the patient understands that they can request a new therapy evaluation at any time by letting the nurse know
Visit Frequency: This will be "1w1" or "1d1" with the effective date being the date of evaluation. Either notation is fine.
Care Coordination: The checkbox that the physician was notified of the POC and treatment must be checked off.
Goals & Interventions: You still need to supply a goal or two along with interventions. To qualify as a completed visit, the "Progress to Goals" section demonstrates that skill was provided. It's easiest to just enter this into the free text area rather than searching through. The date for the goal to be met will be the evaluation date. Recommended goals and interventions:
The Goals and Interventions don't have to be complex. In fact, more complex goals and interventions (e.g. safe ambulation or safe transfers) would indicate the need for at least one additional visit to assess for carryover, so keep these simple. Once the goals and interventions are listed, you MUST perform the interventions and then mark them as met, clicking the Submit button each time. You do NOT need to click the "Document Progress" drop-down, as the goal will be met. See below for complete steps.

Once the goal and corresponding interventions are added, select "Perform" next to each intervention.

In the box that opens up, select the checkbox next to "Patient" and/or "Caregiver" and the result dropdown. You must click the "Submit" button for this to save.

Once all of the interventions are performed, select the "Update" button and select "Goal Met". There will be a warning that no further interventions can be performed and that these will be marked as completed; just hit "Ok" to continue. As a time-saver, you don't need to use the "Intervention Complete" button, as selecting "Goal Met" will do this automatically.
Discharge Order: Complete a new physician order stating that the patient is discharged from therapy service and is an evaluation only.
Communication Note: In the communication note for the therapy frequency, input "1w1" or "1d1" and state that it's an eval-only so that the CM/Supervisor are made aware.
Narrative: You must include a statement that the patient understands that they can request a new therapy evaluation at any time by letting the nurse know
Visit Frequency: This will be "1w1" or "1d1" with the effective date being the date of evaluation. Either notation is fine.
Care Coordination: The checkbox that the physician was notified of the POC and treatment must be checked off.
Goals & Interventions: You still need to supply a goal or two along with interventions. To qualify as a completed visit, the "Progress to Goals" section demonstrates that skill was provided. It's easiest to just enter this into the free text area rather than searching through. The date for the goal to be met will be the evaluation date. Recommended goals and interventions:
Goal: "Patient will demonstrate household safety awareness"
Intervention: PT/OT to instruct in removal of throw rugs
Intervention: PT/OT to instruct in fall risks due to current medications
Intervention: PT/OT to instruct in fall risk due to oxygen tubing
Intervention: PT/OT to instruct in slow position change
Goal: "PT/OT will complete household safety evaluation"
Intervention: PT/OT to assess home for additional devices and recommend these to patient
Goal: "Patient will demonstrate understanding of need for skilled services and that they are declining further services at this time"
Intervention: PT/OT to instruct in benefits of therapy and current deficits in ______
Intervention: PT/OT to instruct patient to notify agency for future therapy needs
The Goals and Interventions don't have to be complex. In fact, more complex goals and interventions (e.g. safe ambulation or safe transfers) would indicate the need for at least one additional visit to assess for carryover, so keep these simple. Once the goals and interventions are listed, you MUST perform the interventions and then mark them as met, clicking the Submit button each time. You do NOT need to click the "Document Progress" drop-down, as the goal will be met. See below for complete steps.
Once the goal and corresponding interventions are added, select "Perform" next to each intervention.
In the box that opens up, select the checkbox next to "Patient" and/or "Caregiver" and the result dropdown. You must click the "Submit" button for this to save.
Once all of the interventions are performed, select the "Update" button and select "Goal Met". There will be a warning that no further interventions can be performed and that these will be marked as completed; just hit "Ok" to continue. As a time-saver, you don't need to use the "Intervention Complete" button, as selecting "Goal Met" will do this automatically.
Vital Signs Parameters
| Vital Sign | Maximum | Minimum |
| Temperature | 101º | 95º |
| Heart Rate | 110 | 50 |
| Respiratory Rate | 24 | 10 |
| Systolic Pressure | 160 | 90 |
| Diastolic Pressure | 90 | 50 |
©2018 tlawrencemoran Documentation Services. All rights reserved.